
Idea Validation Checklist: 12 Steps Before You Build
Skipping idea validation is a costly mistake. Nearly 42% of startups fail due to "no market need", often burning through $1.3 million on average. This checklist helps you avoid that by testing your concept before building. Here’s what you’ll learn:
- Define the Problem and Customer: Identify the exact pain points of a specific audience.
- Rank Assumptions: Spot and prioritize the riskiest beliefs about your idea.
- Estimate Market Size: Use TAM, SAM, and SOM to ensure your market is large enough.
- Research Competitors: Understand existing solutions and how you can stand out.
- Conduct Customer Interviews: Get unbiased feedback from real prospects.
- Test Your Solution: Use mockups or simple prototypes to gauge interest.
- Run MVP Experiments: Validate demand with pre-orders, deposits, or landing pages.
- Assess Risks: Identify deal-breaking issues and decide to proceed, pivot, or pause.
The key takeaway? Validation saves time, money, and effort. Use data, not assumptions, to make informed decisions and avoid building something nobody wants. Let’s dive into the details of each step.
::: @figure 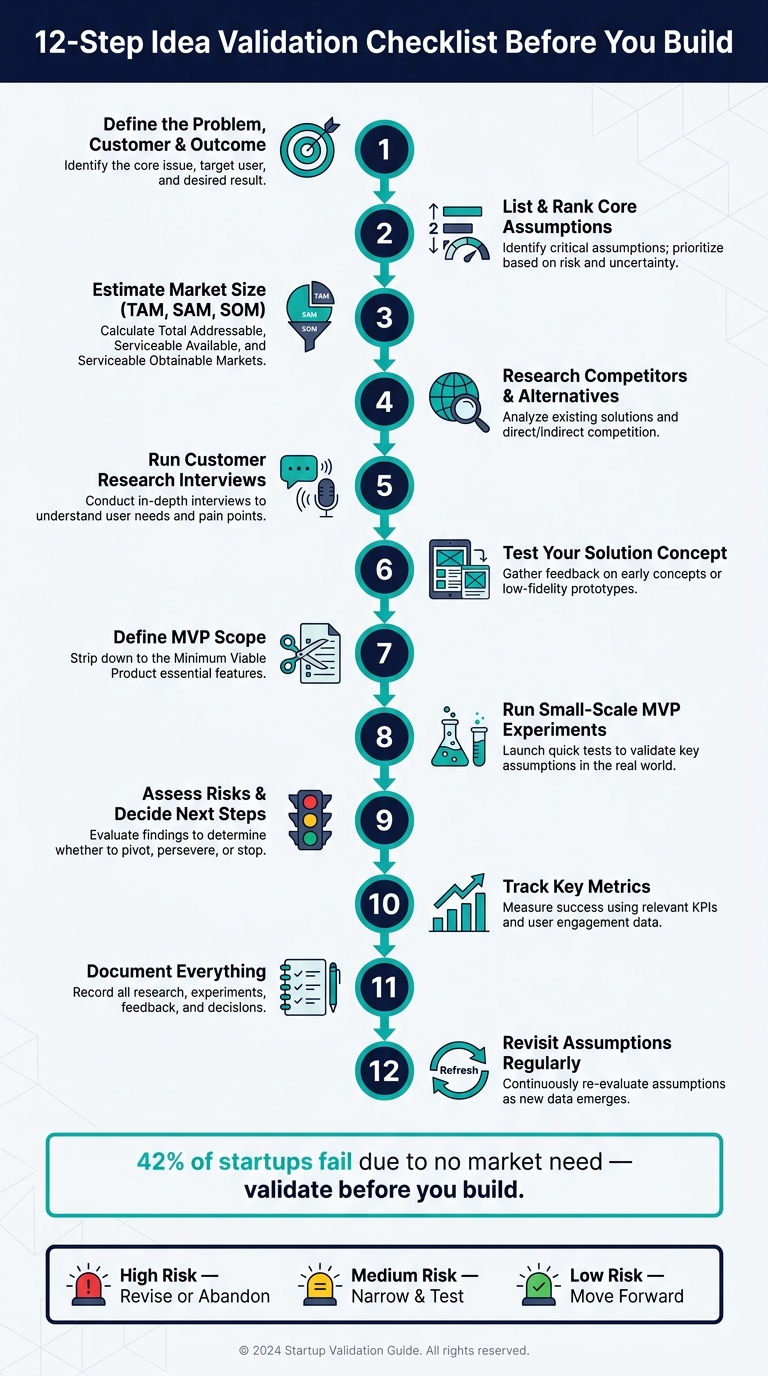 {12-Step Idea Validation Checklist Before You Build}
:::
{12-Step Idea Validation Checklist Before You Build}
:::
Use This PROVEN Formula to Validate Your Next Startup Idea
::: @iframe https://www.youtube.com/embed/d9uCqKEeJbY :::
Step 1: Clearly Define the Problem, Customer, and Outcome
Nailing down three key elements - your target customer, the problem they face, and the outcome they want - is essential. Skipping this is like trying to build a house without a blueprint. You’ll end up making disconnected decisions that don’t lead anywhere.
Identify Your Target Customer
Broad labels like "small businesses" or "marketers" won’t cut it. You need a crystal-clear Ideal Customer Profile (ICP). A simple formula to follow is: "[Role] at [company type] who [specific context]." For example: "Solo Shopify store owners processing 300–2,000 orders monthly and managing customer retention alone."
The more precise your ICP, the easier it becomes to find your audience, engage with them, and confirm if your idea solves their problem. This isn’t about shrinking your market - it’s about improving your focus.
Define the Problem
Describe the problem without mentioning your solution or using product-specific jargon. Boil it down to one sentence: "[Specific Role] struggles with [Specific Pain] resulting in [Measurable Consequence]."
Focus on problems with real, negative impacts, like financial losses, missed deadlines, or compliance risks. These are the kinds of issues people will pay to fix, unlike minor inconveniences that are just "nice-to-solve."
Clarify the Desired Outcome
What does success look like? Define it in measurable terms. For example, does your idea save 5 hours per week, eliminate a $500/month workaround, or reduce churn by 10%? Quantifying the outcome not only helps you figure out pricing later but also gives you a clear metric to validate your idea.
Set a specific success target before you start building. Something like, "10 paying customers at $99/month within 30 days," gives you a concrete goal. Without a number, you might keep going even when the validation signals are weak.
Tools like InspectIdea can help you structure these definitions by capturing your target customer, problem statement, and desired outcome. This clarity lays the groundwork for ranking your assumptions in the next step.
Step 2: List and Rank Your Core Assumptions
After defining your customer, the problem, and the desired outcome, it’s time to dig into the beliefs that form the backbone of your idea. Every business idea is built on a set of assumptions. The real danger isn’t in having these assumptions - it’s in failing to identify the ones that could derail your idea.
What Are Core Assumptions?
Core assumptions are the unverified beliefs that support your business model. They typically fall into five key areas:
- Problem: The issue you’re addressing must be significant and frequent enough to demand a solution.
- Customer: A specific group of people must actually experience this problem.
- Solution: Your approach must stand out compared to existing alternatives.
- Monetization: Customers need to be willing to pay the price you’re asking.
- Distribution: There must be an affordable and effective way to reach your audience.
Focusing on the most critical assumptions early can simplify your validation process. To uncover these assumptions, ask yourself: “What absolutely has to be true for this idea to succeed?” Then, identify your top three assumptions that could make or break your idea.
"Every solution has one assumption that, if false, invalidates the entire product. Not ten risks - one load-bearing assumption. Name it." - Thruvon [2]
Keep in mind that verbal interest doesn’t equal actual commitment. Real proof comes from actions like pre-orders or payments, not just words.
Once you’ve outlined your assumptions, the next step is to figure out which ones pose the biggest threats to your idea.
Rank Assumptions by Risk Level
Not all assumptions carry the same weight. Some are more critical than others. Use a simple three-tier system to rank their risk level and decide which ones to test first:
| Risk Level | Implication | Action |
|---|---|---|
| High (Red) | The assumption is speculative, overly broad, or contradicted by evidence. | Don’t proceed. Either revise the assumption or consider abandoning the idea altogether. |
| Medium (Yellow) | There’s some evidence, but it’s unclear or the target audience is too broad. | Narrow your focus or run a targeted test to gather clearer proof. |
| Low (Green) | Strong evidence supports the assumption from real customer feedback. | Move forward to the next assumption or begin building a small-scale MVP. |
When ranking, consider both the impact of each assumption on your success and the quality of evidence supporting it. Any assumption based on opinions rather than hard data - like direct quotes, sales transactions, or measurable metrics - should be treated as high risk.
The order in which you validate your assumptions also matters. Start with the Problem and Customer assumptions before moving on to the Solution. After all, if the problem doesn’t exist or isn’t significant, the solution becomes irrelevant. Set clear benchmarks for each test, such as: “If fewer than five pre-orders are made within 30 days, we’ll need to reassess.” This approach helps you avoid wasting time and resources on ideas that might not work.
Tools like InspectIdea’s validation checklists and risk assessment frameworks can help you categorize your assumptions and track evidence as you collect it. By following this structured process, you’ll reinforce the work you did in Step 1 and build a stronger foundation for your idea.
Step 3: Estimate Market Size and Revenue Potential
Understanding market demand is crucial. Without it, you risk wasting 6 months and $50,000, which is the average cost for founders who realize too late that their solution doesn't resonate with the market [13]. Accurately estimating market size sets the groundwork for testing your revenue model.
Calculate Market Size
Market size is broken into three layers: TAM, SAM, and SOM. Each layer narrows down your potential audience, helping you focus on realistic opportunities.
| Metric | What It Measures | How to Calculate |
|---|---|---|
| TAM (Total Addressable Market) | The full potential market for your product | (Total potential customers) × (Target price) |
| SAM (Serviceable Addressable Market) | The segment of TAM you can reasonably target | Filter TAM by geography, industry, and available channels |
| SOM (Serviceable Obtainable Market) | The portion of SAM you can capture in the first 1–2 years | Based on your current resources and short-term goals |
A bottom-up approach works best here. Identify real customers on platforms you plan to target, then multiply by your price. This method keeps your estimates grounded in reality instead of vague percentages.
"TAM big enough that 1% gives a real business - and a SAM small enough that you can plausibly reach the first 100 customers." - GoNoGo.team [9]
Here’s a handy rule of thumb: if capturing just 1% of your TAM doesn’t lead to a viable business, your market might be too small. For SaaS businesses, aim for a $10M TAM minimum to ensure profitability [4]. If your numbers fall short or the market shows little growth, it might be time to rethink or drop the idea.
Estimate Revenue Potential
Once you’ve confirmed market size, the next step is to determine if your pricing and cost structure can sustain your business. A market’s existence alone isn’t enough; the financials need to add up. Start with this basic formula:
Annual Revenue = Price × Volume − Cost to Acquire (CAC) − Cost to Serve
To stay on track, aim for a LTV-to-CAC ratio of at least 3:1. A ratio below 2:1 suggests your model needs adjustment [3]. Also, consider your payback period: less than 18 months for SMBs and under 24 months for enterprise customers is ideal [4].
You can also validate interest by checking search demand. Tools like Google Keyword Planner can help; a minimum of 1,000 monthly searches for your core problem is a good sign [12]. If search volume is low, it doesn’t mean your idea is dead, but you’ll need stronger proof of demand - like pre-orders, deposits, or signed Letters of Intent (LOIs).
"If the math doesn't work on paper, it won't work in reality." - IdeaKiller [3]
Step 4: Research Competitors and Existing Alternatives
Once you've confirmed that your market is large enough to support a business, the next step is figuring out: who’s already solving this problem? Skipping competitive research is one of the costliest mistakes early-stage founders make, as it can help you identify potential pitfalls early on.
Map Competitors and Alternatives
Many founders focus only on direct competitors - companies offering nearly identical products. But the competitive landscape is broader than that. It includes indirect competitors (tools that solve the same problem differently) and the status quo (manual processes, spreadsheets, or simply doing nothing). The status quo can be the toughest competitor, as it represents the resistance to change you'll need to overcome.
"Competition validates demand. Zero competitors is a warning sign, not a good sign. If no one else is solving this problem, ask yourself why." - IdeaKiller [3]
Identifying 3–10 competitors is typically a good sign. It shows the problem is significant enough that people are willing to pay for solutions. On the other hand, finding no competitors can suggest one of two things: either the problem isn’t painful enough to monetize, or you’re not using the right search terms [4].
To map competitors effectively, use the language your customers use to describe their problems. Avoid relying solely on your product's technical terminology. Platforms like G2 and Capterra can reveal common customer frustrations, while niche communities on Reddit, Slack, or Twitter/X often have discussions about alternatives.
Another key indicator is paid search competition. If companies are bidding on your target keywords via Google Ads, it’s a strong sign that the market economics are already validated [6].
These insights will help you refine your unique value proposition (UVP) and highlight what sets your solution apart.
Define Your Unique Value Proposition
Once you’ve mapped competitors, the next step is to define how your solution stands out. The goal isn’t to be just a little better - it’s to be distinctly different and appeal to a specific group of customers. A helpful formula to start with is:
"Unlike [Competitor X], which [Primary Weakness], we [Unique Value Proposition for Specific Niche]" [6]
Look for gaps that existing solutions consistently overlook. These could include issues like a steep learning curve, pricing tiers that exclude smaller businesses, or workflows that require users to change their habits. If leading tools in your space haven’t introduced meaningful updates in over six months, their users might already be frustrated and open to alternatives [6].
Real-world examples show how a clear UVP can validate an idea before you even build the product. Drew Houston demonstrated Dropbox’s potential with a 3-minute video highlighting the complexity of existing file-syncing tools. The result? A waitlist that jumped from 5,000 to 75,000 signups overnight [10]. Similarly, Joel Gascoigne tested Buffer’s concept with a two-page landing site: one page explained the idea, and the other collected email addresses. A pricing page further confirmed users’ willingness to pay - all before a single line of code was written [10].
Your UVP should pass the “stranger test”: can someone unfamiliar with your product understand your differentiation in one sentence? If it takes a paragraph to explain, it needs more refinement.
Step 5: Run Customer Research Interviews
Now that you've outlined your competition and identified what makes your idea stand out, it's time to put your assumptions to the test by speaking directly with the people you want to serve.
Recruit and Interview Prospects
After validating your assumptions, the next step is having direct conversations with potential customers to confirm the problems you've identified.
Skip friends and family. Their feedback often leans supportive rather than honest. Instead, focus on prospects who align perfectly with the customer profile you defined earlier. A narrow, well-defined target audience will yield more actionable insights.
You can find these prospects in places they naturally frequent - LinkedIn for business professionals, Reddit or Discord for niche communities, or even through targeted cold emails. When reaching out, keep your message straightforward and non-salesy. For example, try something like: "No pitch - just a few genuine questions about how you handle [problem area]." Offering a small incentive, like a $10 Starbucks gift card, can also make participation easier and show you value their time.
Aim for 10 to 15 interviews. Gregory Shepard, CEO of Startup Science, explains it well:
"Ten to fifteen conversations with people in your target market is the practical minimum. You're looking for pattern convergence: when new interviews stop revealing new information, you've talked to enough people." [1]
During these interviews, focus on what customers actually do, not what they might do. Ask questions like, "Can you walk me through how you currently handle this?" or "When was the last time this problem came up?" Avoid hypothetical questions like, "Would you use a tool that does X?" since they often lead to overly optimistic but unreliable answers. If someone struggles to recall a recent example, note this as a possible warning sign.
Document your findings as soon as possible to refine your assumptions before moving forward.
Analyze and Document Your Findings
After completing your interviews, take a systematic approach to analyze the conversations and spot recurring themes. Record key quotes, their sources, and your confidence in the information. A simple scoring system can help - score evidence as 1 for well-documented, 0.5 for partially documented, and 0 for untested assumptions [7]. This method keeps your conclusions grounded in actual data rather than intuition.
As you review your notes, pay close attention to problems that were mentioned without prompting. These unsolicited mentions often highlight the audience's biggest concerns. Also, note if they’re using any workarounds, like spreadsheets or manual processes, to address the issue. On the flip side, if fewer than 5 out of 10 people bring up the problem on their own, it might indicate that the issue isn't a high priority for this group [2].
Once your interviews are wrapped up, revisit the assumptions you ranked back in Step 2. Update them based on what you’ve learned. The goal here isn’t to confirm your initial beliefs - it’s to identify where you might have been off track before committing more resources. Use these updated insights to re-evaluate your key assumptions before moving on to the next step.
Step 6: Test Your Solution Concept
Now that you've completed your customer research interviews and refined your assumptions, it's time to present your concept to potential users. This is your chance to gather meaningful feedback through an initial visual representation of your idea.
Build Simple Sketches or Mockups
Your goal here is to clearly communicate your idea and spark honest reactions. This doesn't require anything fancy - a rough sketch, a clickable prototype in Figma, or even a short written description of your workflow can work. Tools like Marvel or Uizard are great for creating basic clickable mockups in as little as one or two hours.
Keep it simple. Focus on the "core loop" of your concept: onboarding, the main value screen, one secondary action, and a pricing or conversion screen. Aim for about 5 to 7 screens total. To make the experience feel real, include sample data to avoid an empty or incomplete look.
If building a visual prototype feels like overkill, there are other ways to share your idea. A straightforward Notion document, a short explainer video, or a guided walkthrough on a landing page can work just as well. The key is ensuring your audience understands what you're offering.
Gather Feedback Through Solution Interviews
Once your mockup or concept is ready, take it back to the same type of prospects you interviewed earlier. Structure these conversations into five stages: context setting, problem exploration, current solutions, solution reaction, and commitment. Keep the sessions concise and to the point.
When presenting your concept, describe it in a neutral and succinct way - ideally in under 30 seconds. Avoid being overly enthusiastic or providing too much detail upfront, as this can lead to "politeness bias", where people tell you what they think you want to hear. Instead, focus on observing their behavior. Hesitations, confusion, or even skipping a screen are all valuable signals. Remember, confusion itself is a form of feedback.
The most telling feedback comes not from verbal approval but from behavioral commitment. Look for actions like signing up, agreeing to pay a deposit, or offering to introduce you to their team. For example, Brian Shin, founder of the disposable camera app Once, validated his idea by getting commitments from 10 event hosts before writing a single line of code. Within 30 days, he secured 12 events, which gave him the confidence to move forward. The app went on to generate $20,000 in monthly recurring revenue within 83 days [14].
"We made sure that people committed to this product before writing a single line of code." - Brian Shin, Founder, Once
Before each session, establish clear "kill criteria." For instance, you might decide, "If 0 out of 10 prospects agree to a follow-up call, I'll pivot the audience." This ensures your decisions are based on evidence, not wishful thinking.
Step 7: Define the Scope of Your Minimum Viable Product (MVP)
Now that you've gathered customer insights and validated your solution concepts, it's time to zero in on what to build - and just as importantly, what not to build. Defining the scope of your MVP can be tricky, especially when the temptation to add extra features creeps in. Stay focused, and don't let feature creep derail your progress.
Prioritize Features
Think of your MVP as a focused experiment designed to test your riskiest assumption - the one you identified earlier during validation. Keep it simple: limit your MVP to just three core features. Focus on one specific buyer, one recurring workflow, and one promised outcome [5]. Anything beyond that? Label it as "out-of-scope" to keep your development process lean.
"Cut features until the MVP is small enough to feel embarrassing. That is roughly the right size." - Thruvon [2]
When deciding what to include, prioritize features that address urgent, high-impact problems - often referred to as "painkillers." These are the features that will make customers ditch their current solutions, whether that's a spreadsheet or a manual process.
To validate your concept further, consider a concierge MVP. This involves manually delivering the core value to a small group of users. It’s a great way to uncover issues that traditional interviews might miss.
"The concierge approach reveals problems that no amount of interviewing can surface." - Gregory Shepard, Founder and CEO, Startup Science [1]
By setting these boundaries, you'll create a clear path to measurable success.
Set Clear Success Metrics
Once you've narrowed the scope, it's time to define success. Be specific - vague goals won't cut it. For example, instead of saying, "We want early traction", aim for something like, "10 paying customers at $99/month within 30 days" [2]. Precise targets eliminate ambiguity and give you a clear benchmark.
Establish both target metrics and kill criteria. For instance, you might set a goal of 80% core-task completion to confirm your MVP's viability. If you're running a landing page test, aim for a conversion rate above 5% from cold traffic [1]. Even better, prioritize metrics like paid pre-orders or deposits over email signups - because nothing signals demand like a credit card number [11].
"The MVP is not a smaller product. It is the minimum experiment that tests the riskiest assumption." - Thruvon [2]
Finally, make sure your MVP is realistic. It should be something you can build in under 60 days with your current resources [2]. If it looks like it'll take longer, trim the scope even further. Simplicity is your best friend here.
Step 8: Run Small-Scale MVP Experiments
With your MVP (Minimum Viable Product) scope defined, it’s time to test your idea with real users - without pouring excessive resources into development. The goal here isn’t to perfect your product but to gather honest feedback and behavioral data quickly and affordably. This step connects your MVP outline to real-world testing that can reveal its market potential.
Choose Affordable Experiment Types
Focus on experiments that prompt users to make actual decisions. These methods are both cost-effective and insightful:
- Landing page smoke test: Create a simple webpage showcasing your value proposition and include a clear call to action. Use a modest ad budget - around $300 to $500 - to drive 500–1,000 targeted visitors, then measure how many act on the offer [4].
- Fake-door test: Add a button or feature option for something that doesn’t yet exist. If users click on it, you’ve validated interest. If not, you’ve saved time and resources [16].
- Pre-sales and deposits: Request a small upfront payment, even as little as $5–$10. This separates serious buyers from those who are merely curious or polite [15][17].
- Letters of Intent (LOI): In B2B settings, ask prospects to sign a non-binding document indicating they’d purchase if the product meets specific conditions. This is one of the strongest signals of intent you can gather [15][16].
"Someone saying they'd use your product is a reaction. Someone paying a deposit to get early access is a decision. One costs them nothing. The other does." - Vinay Kevadia, CEO, Upmetrics [17]
The idea is to climb the evidence ladder - progress from weaker signals like email signups to stronger ones like deposits or signed LOIs as quickly as possible [15].
Track Key Metrics
Once you’ve outlined your MVP experiments, it’s critical to define measurable goals upfront. This prevents confirmation bias and ensures you’re interpreting results objectively.
For example:
- A landing page test with a conversion rate below 1% (from 1,000 visitors) signals low interest. A rate between 3–7% suggests potential, while anything above 7% indicates strong demand [4][11].
- A pre-order conversion rate above 5% is a solid indicator of strong buyer intent [18].
- In B2B, even a 1–2% rate for deposits or LOIs is considered a strong signal [11].
"Speed of decision is more important than confidence in decision. Killing a bad idea in 14 days is a win. Building the wrong idea for 6 months is a tragedy." - FoundrList [18]
To maintain momentum, limit each experiment to 7–14 days [11][16]. These short sprints create urgency and prevent endless tweaking. If your results fall short of the threshold, use the data to decide whether to pivot or move on. Remember, the goal is to make fast, informed decisions that keep you on track toward validating your idea.
Step 9: Assess Risks and Decide How to Move Forward
With your MVP experiments wrapped up and data in hand, it’s time to take a hard look at potential risks and determine whether your idea is ready to move forward - or if it’s time to pause or pivot.
Review Market, Competitive, and Execution Risks
Every idea comes with its own set of challenges - whether in the market, competition, execution, or finances. The table below highlights key warning signs and positive indicators to help you evaluate where your idea stands. For instance, did you know that 42% of startups fail because there’s no real market need? [9]
| Risk Category | Red Flag (Pause/Pivot) | Green Signal (Proceed) |
|---|---|---|
| Market | The problem is a "nice-to-have"; declining search trends | Users are spending time or money on makeshift workarounds |
| Competitive | No clear reason for users to switch from their current tool | Frequent complaints about competitors’ complexity or pricing |
| Execution | You can’t name 10 real people who face this problem | You have direct access to a reachable niche community |
| Financial | LTV:CAC ratio is below 2:1; margins vanish at scale | Clear path to recurring revenue with manageable acquisition costs |
One area founders often overlook is distribution. Even the best product will fail if you can’t find a reliable channel to reach your first 20–100 customers. Another hidden trap? Invisible work - those sneaky costs like customer support, rework, or chasing payments that quietly eat away at your margins.
Before moving forward, ask yourself: What’s the one thing that could make this idea impossible to build? It might be a regulation, a patent issue, or even a dependency on a specific platform. Spotting this early can save you time and resources.
Use these risk signals to guide your decision-making process.
Decide to Proceed, Pivot, or Pause
Once you’ve assessed the risks, it’s time to decide your next step. Don’t rely on gut instinct alone - evaluate your core assumptions with a structured approach. Think of it like a traffic light:
- Green: You have solid evidence from real buyers.
- Yellow: You’re seeing mixed signals that require further testing.
- Red: Your assumptions are speculative or contradicted by your data.
"Validation after building is not validation. It is damage assessment." - Thruvon [8]
Here’s how to move forward based on your findings:
- If your buyer validation, problem severity, competitive edge, and monetization signals are strong, focus on building the narrowest MVP for one core workflow.
- If the problem is real but your distribution or monetization signals are unclear (Yellow), narrow your target niche or run a more focused test.
- If the problem feels weak, buyers are unreachable, or your unit economics are in the Red, stop. Save your data and focus on a stronger idea.
"The earlier you can kill a weak idea, the cheaper that lesson is." - Louis Corneloup, Founder at Dupple [19]
To avoid emotional attachment to a failing idea, write down your stop criteria before you start building. For example, set conditions like “no paid signups after 500 visitors” that will force you to pivot or pause if unmet. Refer back to the success metrics you defined in Step 8 when setting these criteria. This simple step can save you from costly mistakes and help you focus on ideas with real potential.
Conclusion: Putting Your Validation Checklist to Work
Validation isn’t just a one-time checkpoint - it’s an ongoing process that evolves with every stage of your journey. From defining your problem and identifying your customer to ranking assumptions, sizing the market, mapping competitors, conducting interviews, testing concepts, scoping your MVP, running experiments, and assessing risks - each step builds on the last. The goal? Replace guesswork with real, actionable evidence.
The biggest mindset shift this checklist encourages is straightforward: rely on data, not instinct. Gregory Shepard, Founder and CEO of Startup Science, explains it perfectly:
"Founders building their first startup often treat validation as a gate they pass through once, rather than a discipline they practice throughout the lifecycle." [1]
Markets change, competitors adapt, and customer needs shift. What seemed like a solid signal in January could look entirely different by Q3. That’s why it’s smart to revisit your assumptions regularly - ideally every quarter or after every 10 to 20 customer conversations - to ensure your foundation remains strong.
Here’s one habit that sets disciplined founders apart: document everything. Track not just your successes but also the contradictions, weak signals, and pivots. Keeping an evidence log with details like the source, date, and confidence level of each insight - think “14 of 18 interviewees reported weekly pain” - grounds your decisions in facts, not wishful thinking. [7]
For this kind of ongoing validation work, tools like InspectIdea can be a game changer. It provides a structured workspace where you can outline your idea, test assumptions with proven frameworks, tag findings as supporting or contradicting evidence, and monitor risks across market, competition, execution, and finances. Instead of juggling scattered notes and endless chat threads, you get a clear, measurable view of where your idea stands.
FAQs
::: faq
What’s the fastest way to validate demand without building?
The fastest way to confirm demand is by obtaining proof of willingness to pay or a clear commitment, like pre-orders, deposits, or scheduled calls. While research and interviews can provide insights, actions involving money or time are far more reliable indicators.
One effective method is to build a straightforward landing page that outlines the problem you're solving and the value you offer. Then, direct targeted traffic to this page and track conversions that require a "hard" action. Keep in mind that email signups, while helpful, aren't as strong a signal of genuine interest. :::
::: faq
How do I choose my one “load-bearing” assumption to test first?
Start by identifying all the main assumptions your business model depends on. These typically fall into categories like market, product, revenue, and distribution. Once you've listed them, rank each assumption based on two factors: how essential it is to your success and how confident you are in its accuracy.
Pay close attention to those assumptions that are both highly essential and low in confidence. These are the riskiest to your business if they turn out to be wrong. Addressing and testing these first will help you avoid wasting time and resources down the road. :::
::: faq
What’s “enough” proof to proceed vs pivot?
Enough proof means having solid, tangible evidence that turns your idea from a guess into something you can trust. This means proving the problem is pressing, happens often, and that customers are either actively searching for fixes or spending money on temporary solutions. You’ll also need clear indications that they’d be willing to pay for what you’re offering.
If your research stays in the realm of guesswork, lacks real user data, or falls short of key benchmarks - like few positive responses in interviews or weak interest in demand tests - it’s a sign you may need to pivot. :::